Tuesday, July 28, 2009

Cutting Lattice Strips

Today I had a light bulb moment. Probably most people know this already, but just in case you haven't thought about it, I thought I'd share.

There I was this afternoon, wrestling with 3.5 yards of white Kona cotton for the lattice strips of the quiltalong nine patch I've been working on. My usual way is to cut lattice strips 2.5" WOF (width of fabric), as you see below:

I like to fold the fabric over and cut four thicknesses at a time because it's easier for me to handle on my smallish cutting board that way. As I started to sub-cut each strip into 6.5" pieces, I was getting four pieces and what you see below as leftovers:

Now, I don't really mind the two little squares, but I do mind the folded over pieces because I have to take them back to the ironing board, re-press, and line them up again before I make the second cut. I've done this lots of times before, but today I stood there and wondered if there might be a better way.

Then I thought, what if I make the cut the other way around? Instead of cutting 2.5" strips, what if I cut 6.5" WOF strips and then sub-cut those into the 2.5" lattices?

So I tried it. For each 6.5" strip, I was able to sub-cut 4 sets of 2.5" strips--that's 16 lattice strips.

I'm pretty sure there was less waste. The little strip you see to the right in the picture above is what was left over, and that was from 16 pieces. It measures a bit less than 1.5" when it is unfolded.

It is much easier to go from large to medium to small when you're cutting. I also like that the lattice strips are now cut on the grain because there will be a lot less stretch as I assemble the blocks.

Since I was in cutting mode today, I also cut and assembled the binding for one of my nearly finished quilts. Maybe I'll actually be able to get it sewn on some time this week.

Sunday, July 26, 2009

Something to Share

I tried this recipe for Moroccan Tomato Soup from the New York Times a week or so ago and we liked it so much we're having it for the second time tonight with dinner. It's a wonderful way to use your beautiful ripe tomatoes without having to heat up the kitchen because it's a cold soup.

I don't often try NYT recipes because here deep in the wilds of the mid-west it is difficult to find many of the ingredients they use without having to go on a grocery safari, and who wants to have to do that?

This one, though, calls for regular off-the-shelf ingredients and turns ordinary tomatoes into a wonderful spicy soup.

Instead of using a food mill (which I don't have) I peeled and seeded the tomatoes and gave them a whirl in the food processor. I halved the amount of garlic and left out the salt (we're on a low-fat, low-sodium diet). I also substituted flat leaf parsley for the cilantro, since I picked up parsley by mistake when I reached for the cilantro at the market.

It tastes good the second day, too. If you have any leftover. Which you probably won't.

Enjoy.

Friday, July 24, 2009

I seem to have taken an unintended blogging (and quilting) break this week.

What I did work on was a cowl using Noro Silk Garden sock yarn using this pattern. I bought the yarn last winter, I think, but I couldn't find anything to use it for, except socks. The yarn is soft, but nubbly, so I didn't really think socks were going to work. If I'd bought two skeins I probably could have made a small shawl, but alas, I only had the one.

It measures about 24 inches in diameter and 15 inches long. I used size 8 needles, which were probably too big for this yarn, but let me tell you, it drapes beautifully. I think it will look good under a jacket this fall. I was amazed with how much I was able to get out of this one skein. I liked the pattern so much that I bought a few balls of cotton yarn to do it again.

Hancock's of Paducah was having a sale on select fabrics. Sigh. It's hard to pass up fabric at half-price. I always justify it to myself that if I don't like the fabric when it comes I can always use if as backing or something. But these are really beautiful.


And these reds. Can you believe that there was a time when I didn't like reds? These are just wonderful.

I've been collecting Turkey reds for a while to make a red and white quilt and I think I probably have enough to get started. One of these days.

I haven't forgotten the bindings for my two big quilts. Once I've fortified myself with another cup of coffee, my plan for today is to get at least one binding put together.

I hope everyone has a great weekend.

Saturday, July 18, 2009

Done!

Done, done, and DONE!


I'm very happy (can you tell?) to finally have this one done. The colors still aren't exactly true, but the little sunshine we have today is thin and fleeting.


This goes to the quilter on Thursday.

The pattern is Blooming Nine Patch from Tradition with a Twist: Variations on Your Favorite Quilts by Blanche Young. I followed the pattern the whole way, no variations on her variations, so to speak. The directions were clear and easy to follow. This one finishes out at about 72" x 82". I played around with the idea of adding borders, but I am leaving it as it is.

I hope you all are having a great weekend.


Friday, July 17, 2009

Antique Quilt Dating


I won these Antique Quilt Dating Guides from a Friday give away at Quilting Gallery. One is for quilts from 1775-1900, the other is for quilts from 1900-1950. Let me tell you, they pack a lot of information into a really small format. They are small enough to tuck into a bag if you're heading out to an auction or yard sale.

They are right up my alley, so to speak, as I am very interested in quilt history. Not that I'd ever be able to afford an antique, but who knows what you'll run into at the local thrift store?

Many thanks to Michele at Quilting Gallery and Kim Wulfert, who is the author of the guides.

The nine patches are back up on my design wall. I bought the sashing material and I'll start working on putting this top together as soon as finish the blooming nine patch. Progress on that has been very slow, although I have been working on it every day this week. I have already lined up a longarmer and I am due to drop it off next Thursday, so I better get busy and get it done.

Tuesday, July 14, 2009

A Finish

I've taken advantage of the lower temperatures and humidity for the past couple of days to try to tame the weeds and the ivy in the flower beds. The ivy sprawls everywhere given half a chance and the weeds will hide out under the other things and then just suddenly pop up fully grown. It's kind of satisfying to yank out those ivy vines.

When we lost the two trees in the front yard we lost the benefit of their heavy shade; most of my beautiful shade plants are sunburned and ragged looking. I guess I'll have to be looking for some sun-loving perennials.

I actually finished binding the smallest quilt on my list. It's about 31 x 31 inches. As soon as I finished the binding I popped it into the wash and it came out all nicely puckery and squishy.


It's the largest thing I have machine quilted on the Bernina, and I'm still a beginner at this so we won't look too closely at the actual quilting, okay?


I made it using a package of charm squares and a bit of neutral from my stash. I still can't find the pattern; it looks like it might have been a casualty of my sewing room clean up a few weeks ago. If anyone knows, please let me know so I can credit the designer.

I'm down to the last four nine patches for the quilt along at crazy mom quilts. I have the fabric cut, but I ran out of time this afternoon, so I guess I'll take it up tomorrow. Right now I have to clean up and get going to my book club meeting.

Sunday, July 12, 2009

Finishing Projects

There are a LOT of seams in this quilt top. I worked on it for most of the week and only got half of it put together.

Unfortunately, the pictures don't really do it justice; the center looks washed out and the quilt as a whole looks blotchy. Trust me, it looks much better in real life.


I put it aside for the weekend, but I'm going to keep going with it and I hope to have it done sometime next week. Then it's off to the quilter.

I've been following Karen's posts at sewprimitive quilter about getting bindings on a stack of her quilts. My stack isn't quite as big as hers, but I do have several which have been waiting for bindings forever. Friday I stopped by the LQS and bought enough fabric to get three of them done. It seems ridiculous to have so many quilts so close to being done and just let them sit there.

I guess this is turning into my Summer of Finishing Projects.

Friday, July 10, 2009

My First Quilt

Camille at Simplify and Carrie at La Vie en Rosie are hosting a virtual Parade of Quilts--first quilt and last quilt. I thought it would be fun to play along.

Here is my first quilt. I took a quilting class sponsored by our local parks & recreation department. The woman who taught it was a long-time quilter who instead of having everyone work on the same thing just encouraged us to start a project and work on it during our class time.

This was in the days before rotary cutters, so all the pieces were carefully cut out using cardboard templates and rather dull scissors. (I was such a newbie that I didn't even realize that scissors needed to be sharpened periodically!) Fabric choices were extremely limited in those days, especially for 100% cotton.

We had the class in the middle school home ec room and we were allowed to use the school's sewing machines, but I got so frustrated with them that I ended up just hand sewing everything together. I finished the top and began quilting it. I even made my own quilting templates and carefully traced the design on the navy blue fabric with a bit of chalk. And then...well, lots of stuff happened. My project ended up in a bag which got buried in the back of my closet.

Years later I found it one day, took it out of the bag, and said what I always say when I go back to an unfinished project--"Hey this thing is almost done!" I finished quilting it and it sits on the back of my couch for a few months each year. You can see the fold lines; I need to fluff it up in the dryer and refold it.

If you DO have to cut out fabric with templates for some project, get a good stiff board and glue finishing sandpaper to it. That will help hold the fabric in place while you trace around it. Use a very soft pencil with a thin lead and drag it around the template gently.


This is my latest finish, which I've blogged about before. This one would not be possible without the use of a rotary cutter.

I think we quilters should find the inventor of the rotary cutter and set a aside a day each year for an international day of celebration to honor that person. International Rotary Cutting Day! Have parades! Invent a new dessert! Take a day off from work to quilt! What do you think?

Wednesday, July 8, 2009

Slow Sewing

Monday I set up the Featherweight in the dining room where it's cooler to continue working on the Blooming Nine Patch. Yes, I'm still working on it; I sometimes think I'm the world's slowest quilter.

I decided to fire up Netflix just to have some background noise while I was working. The first movie that popped up as a recommendation was The Rape of Europa, a documentary about how the Nazis looted art treasures during World War II and the efforts to save and reclaim the art during and after the war.

After about 30 minutes I had to stop sewing because I became so interested in the movie. I watched it all the way through, then restarted it (because I thought I had missed a lot of the beginning) and watched it all the way through again. I can't even remember the last time I watched a movie all the way through once, never mind twice in one day.

It's beautifully photographed and it does what a good documentary should do--it gives you a good overall view of the subject, then zeroes in here and there on a few details that help give you a clearer understanding of the whole. Efforts continue TO THIS DAY to find and return the art treasures to their original owners and to restore other treasures that were damaged during the war.

It's based on a book by Lynn H. Nicholas published in 1994. I actually own this book, but it's one I just never got around to reading. Now I think I will go back and try it again. One more for the to-be-read pile.

If you're more interested on the Hollywood take on this, try The Train, a 1964 movie with Burt Lancaster and Jeanne Moreau. It's the story of French resistance efforts to prevent a German colonel from stealing a trainload of French art treasures as the allies bore down on Paris.

Or better yet, make some popcorn, fire up the 'puter, and watch them as a double feature. The Train is available on Hulu.

Monday, July 6, 2009

What's On My Design Wall

I did a lot of sewing this weekend!

I finished three more of the eight-pointed stars and cut out fabric for a few more. I seriously love this block, and I think I'm just going to keep going until I run out of the fabric I'm using. Each block uses such a little; I'm hoping that I can stretch it out to 15 or so blocks, and make it a small throw quilt.


Next to the stars is a new block I tried from dancing dragonfly quilts, a book I ordered a month or so ago. I had a group of Asian-inspired prints I picked up somewhere that needed a good home in a quilt block. I have long since learned to use fabrics I like in test blocks--otherwise what's the point? The book has several variations of the same basic block and lots of ideas for setting them together. One caution, though. This book is NOT a recipe book for making the blocks--it's more like a self-guided tour. You need to decide what size block to make and then draft your own pattern. Still, it went together really well. Unfortunately it used up most of the only light fat quarter in the fabric group I had, so if I want to continue with this one I'm going to have to find some more.


The disappearing nine-patch is a top that I put together a few months ago. I can't find the original directions, so if you recognize this pattern, let me know so I can credit the designer. Saturday afternoon I quilted it on my sewing machine. Yes, you read it right. I finally decided that the Professor Harold Hill "think system" of learning to machine quilt was not going to work for me. That is, thinking about machine quilting as opposed to actually practicing machine quilting. I sandwiched it, pinned it, took a deep breath and dived right in.

It came out better than I expected, and I learned a lot that I can use the next time I try.

You can check out what others have on their design wall today by clicking on Judy's blog Patchwork Times.


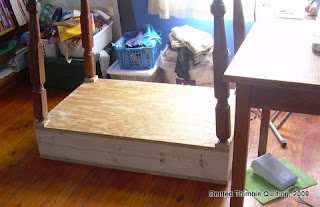
And this is what my wonderful husband greeted me with when I came home from my Friday night sewing group. A platform for my cutting table! I mentioned in my last post that the table was too low for comfortable cutting. We had talked about different solutions, but this one is super. I can continue to use my lovely old table, but at a height that suits me. He even made little cut-outs in the corners for the legs to fit into so the table won't slide around. And at any time we can just lift the table off the platform if it needs to return to its former life as a kitchen table. The height is just perfect for me--no more hunching over to cut.

I hope everyone had a great weekend!

Friday, July 3, 2009

Yesterday I got tired of the mess in my sewing room. I can stand clutter, actually lots of clutter, but I guess I had reached my limit. One of the problems is that I have been working on several different projects, so I had lots of piles sitting everywhere, along with the inevitable debris that just builds up when I'm working.

I spent a couple of hours putting things back into some semblance of order. It's not ready for a photo shoot for HGTV, but at least I can find what I need without having to dig through all those piles.

So, while the mess is somewhat under control I thought I'd show what my sewing room looks like today.


My teeny tiny sewing table, cleared of thread clippings and pins. I would like to have a larger table because sewing large projects on this table is definitely a problem. I usually pull in a kitchen chair to drape things over if I need to. I found a little collapsible table at WalMart that I put to the side for some extra space.

The green thing under the foot pedal is a piece of rubber or plastic that I use to keep the pedal from sliding around on the floor. It's the same material that is sold as cabinet liners by the roll.


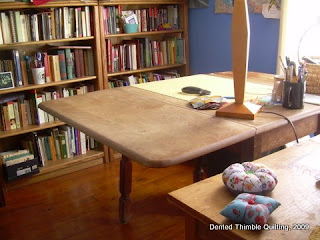
My childhood kitchen table is my cutting table. It's a great size, but unfortunately it's really too low. My husband is working on an idea for raising it a few inches. The legs slant out at a slight angle, so raising it with PVC piping didn't work.

As you can see I share my sewing space with lots of books. David Copperfield is there, along with Huckleberry Finn, Sherlock Holmes, Elizabeth Bennet, Hercule Poirot, and many others. They make good company when I am sewing.

One of the nice things about this room is the light. The windows face northwest; it's very pleasant to sit in there sewing in the afternoons.

I hope everyone has a great fourth of July!